
How to avoid expired certificates
Denis Kazakov, Solution Engineer
While VMware vCenter provides a centralized platform for managing across the hybrid cloud, an expired certificate can turn into an IT nightmare.
Recently, one of our clients experienced an issue with VMware vCenter 6.5. The platform became unavailable because the certificate expired. This expired certificate was not self-signed or automatically created during new vCenter installation, but instead issued by a trusted certificate authority (CA).
Dasher’s expert engineers recommend replacing the certificate on your vCenter and checking the expiration date to prevent a vCenter outage. When a vCenter machine certificate expires, most communication and services will not work properly and fail to function (due to multiple services that are assigned to use that certificate for secure communication).
In this case, our client could not login vCenter, manage it and other third party integration plugins, or backup software failed with tasks.
How to recover a vCenter machine certificate to a fully functional state
Below are the steps our Dasher engineers followed to recover VMware vCenter 6.5 to fully functional state. With some minor changes, they also may be considered for any vCSA version from 6.0 to 6.7.
1. Generate a certificate signing request (CSR)
- Login to vCenter vCSA via SSH. Type shell and press Enter.
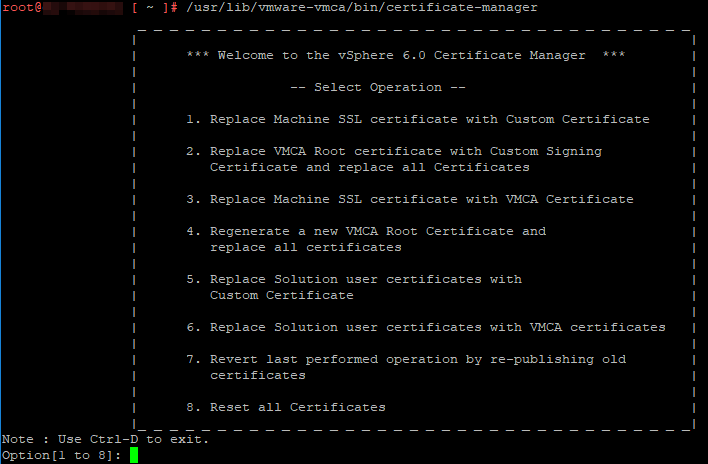
- Run /usr/lib/vmware-vmca/bin/certificate-manager. You will see vSphere Certificate Manager with multiple options to select.
Engineer’s note: In case of an emergency, no accessibility to issue a certificate, or your previous certificate was VMware self-signed (typically certificate valid for 10 years): You may try to revert back by choosing option 7 of Certificate Manager. This will replace the expired certificate with the previous configuration and will make your vCenter functional, so that you may proceed with steps below later.
2. Choose option 1: Replace Machine SSL certificate with Custom Certificate
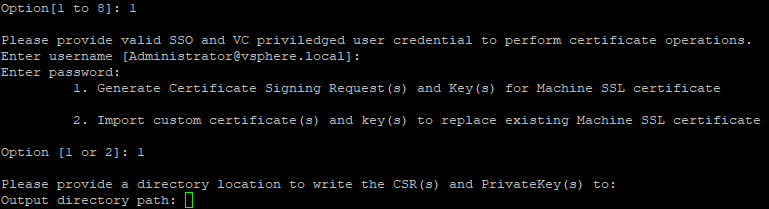
3. Enter SSO and VC administrator credentials (default: [email protected]). Then again, choose option 1 to Generate CSR and Keys for Machine SSL certificate.
4. Then, Certificate Manager will prompt to specify the following values:
- Country: Two letter country code
- Name: FQDN of your vCSA
- Organization: Your organization name
- OrgUnit: Name of your unit/department
- State:State or country name
- Locality: City
- IPAddress(optional): vCSA IP address
- Email: your email address
- Hostname: FQDN of your vCSA
- VMCA Name: FQDN of your VMCA (typically use FQDN of your vCSA
5. Type Yes to proceed.
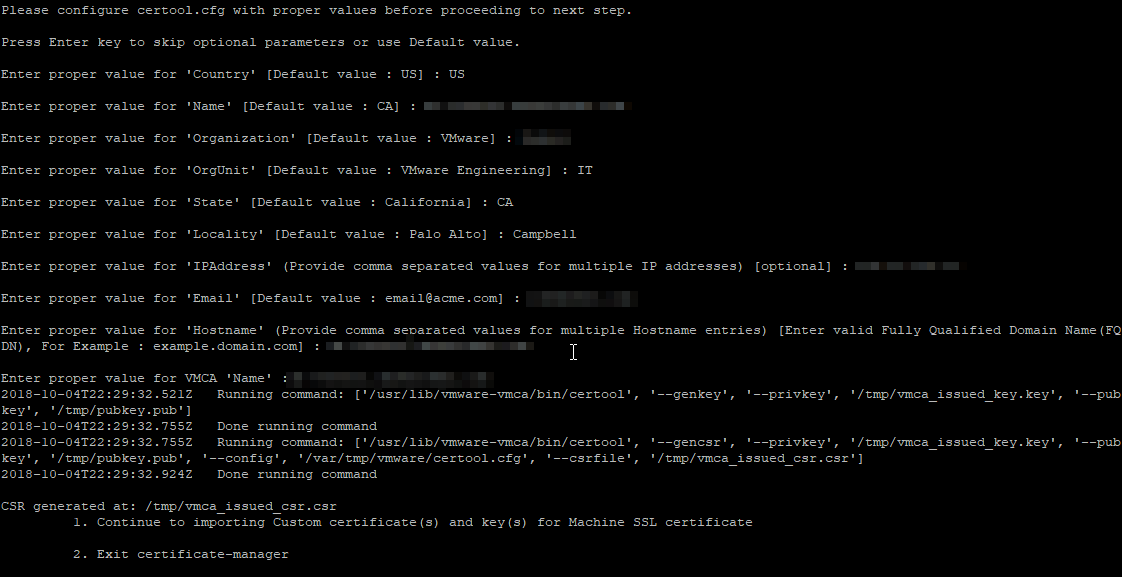
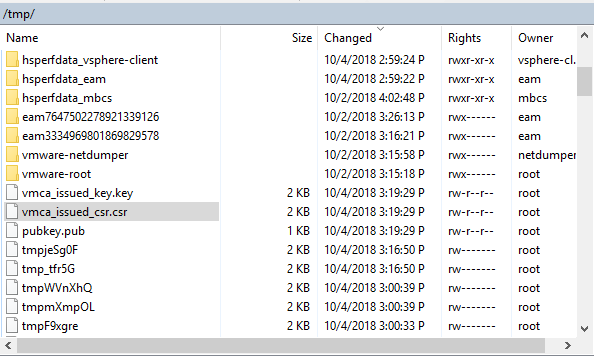
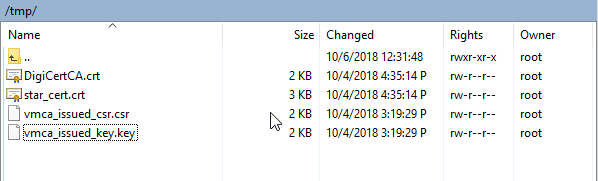
6. Signing request and private key is generated and located in /tmp folder.
7. Download /tmp/vmca_issued_csr.csr file with any tool you use, i.e. WinSCP.
8. If you cannot access vCSA via SSH with WinSCP, run the following command to change default shell to Bash: chsh -s /bin/bash root
9. Go and submit your CSR file to your certificate authority (CA).
10. Download/export the certificate in base-64 format
Engineer’s note: If you have one or more intermediate certificate authorities, the root certificate file should be a chain of all intermediate CA and Root CA certificates. Additionally, machine certificate files should be a full chain for certificate, intermediate certificate(s), and root certificate.
11. Upload signed machine certificate file and CA certificate file to the vCSA, i.e. /tmp folder
12. Run /usr/lib/vmware-vmca/bin/certificate-manager
13. Choose option 1: Replace Machine SSL certificate with Custom Certificate. Enter SSO and VC administrator credentials (default: [email protected]). And now, choose option 2 to import custom certificates.
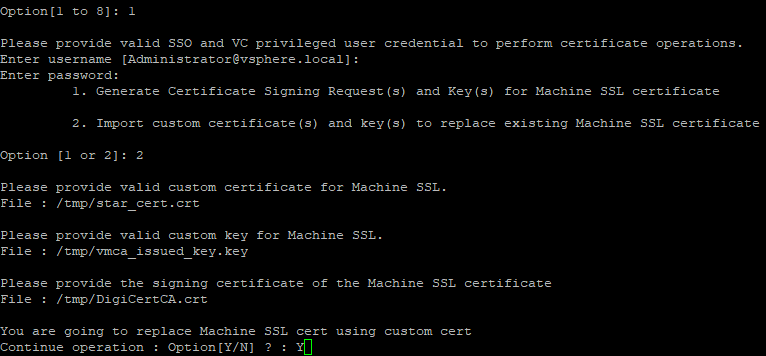
14. Then specify the signed certificate, the private key, and the CA certificate location.
15. Select Yes(Y) to confirm the operation. This may take a few minutes.
16.Once the operation status is 100% completed make sure to restart all the services:
- service-control -–stop –all
- service-control -–start –all
Engineer’s note: If certificate update fails due to specific plugin, disable the plugin and re-run import once again.
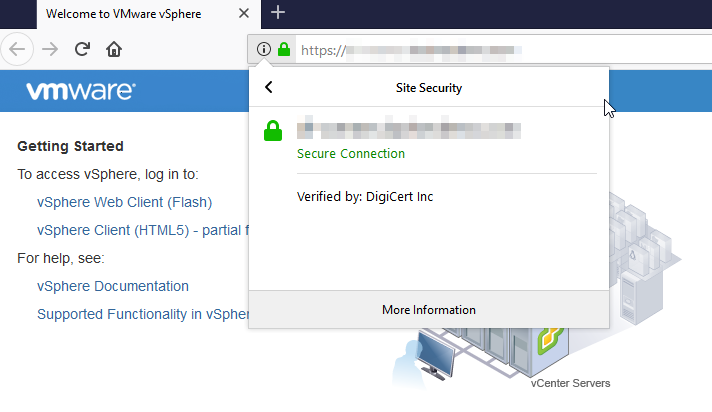
17. Once all services have restarted, connect to the Web Console with browser and verify your new certificate.
18. One more thing:
- After machine vCSA certificate is replaced, you may also find that vCenter VAMI is not accessible.
- To fix that, use the steps below:
- Log in to the vCenter Server Appliance via SSH
- Type shell and press Enter
- Copy CA cert chain to: /etc/applmgmt/appliance/ca.crt
- Open the /opt/vmware/etc/lighttpd/lighttpd.conf file using a text editor
- Add the entry:ssl.ca-file=”/etc/applmgmt/appliance/ca.crt”
- Restart the VAMI service: /etc/init.d/vami-lighttp restart
Engineer’s note: You may also find useful to modify an alarm definition “Certificate Status” to send a trap or email if certificate is to expire soon.
19. Log in to the vSphere Web Client.
20. Select the vCenter Server object, then select the Monitor tab, the Issues subtab, and Alarm Definitions in the left column.
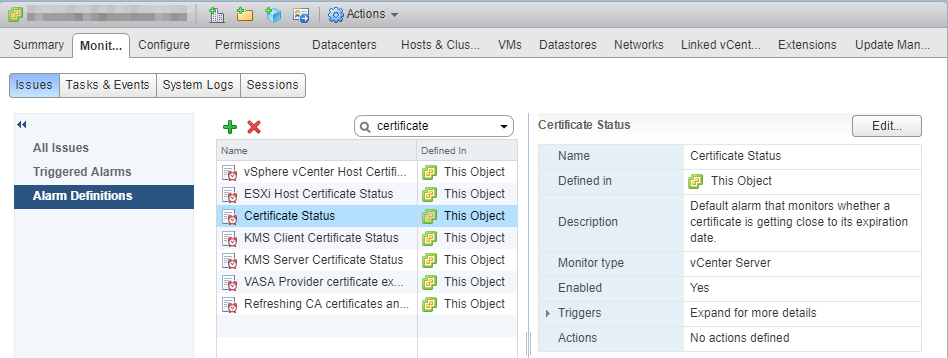
21. Find Certificate Status alarm definition, ensure it is enabled, and specify the actions to be triggered.
22. By default, 30 days threshold is configured. You can modify how soon you would like to be warned.
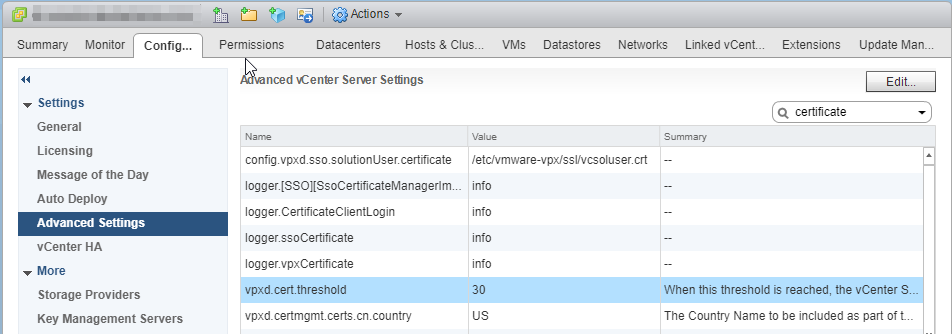
23. Select the vCenter Server object, select the Configure tab, and then Settings in the left side column.
24. Select Advanced Settings, select Edit, and filter for threshold.
25. Change the setting of cert.threshold to the desired value, and click OK.
26. To automate replacing SSL certificates across multiple VMware products, there is a tool worth checking out. SDDC Certificate Tool: https://labs.vmware.com/flings/sddc-certificate-tool
References
- VMware Knowledge Base, Error when uploading files to vCenter Server Appliance using WinSCP https://kb.vmware.com/s/article/2107727
- VMware Knowledge Base, How to regenerate vSphere 6.x certificates using self-signed VMCA https://kb.vmware.com/s/article/2112283
- VMware Knowledge Base, Platform Services Controller Administration https://docs.vmware.com/en/VMware-vSphere/6.7/vsphere-esxi-vcenter-server-671-platform-services-controller-administration-guide.pdf
- VMware Knowledge Base, Replacing a vSphere 6.x Machine SSL certificate with a Custom Certificate Authority Signed Certificate https://kb.vmware.com/s/article/2112277
- VMware Knowledge Base, VAMI does not display the new certificate after changing vCenter Server Appliance 6.x certificates https://kb.vmware.com/s/article/2136693